Docs
Set up once.Read every chart with intent.
PaceAlgo runs as an invite-only indicator on your own TradingView charts. This guide gets you from purchase to your first signal, then explains every element and setting, with the recommended, validated defaults.
Time to first value
Quick start.
Four steps from purchase to your first signal.
Pay, share your TradingView username, find it under Invite-only scripts, add it to your chart.
- 01
Add PaceAlgo to your chart
Open TradingView, go to Indicators, then Invite-only scripts, and add PaceAlgo V1. It appears as an overlay on your price chart.
- 02
Start on a validated market
Open an FX major on the 5-minute chart (GBPUSD, USDJPY, USDCAD, NZDUSD, USDCHF) or a major index on the daily. These are the markets where the signal detection is validated out-of-sample.
- 03
Read a signal
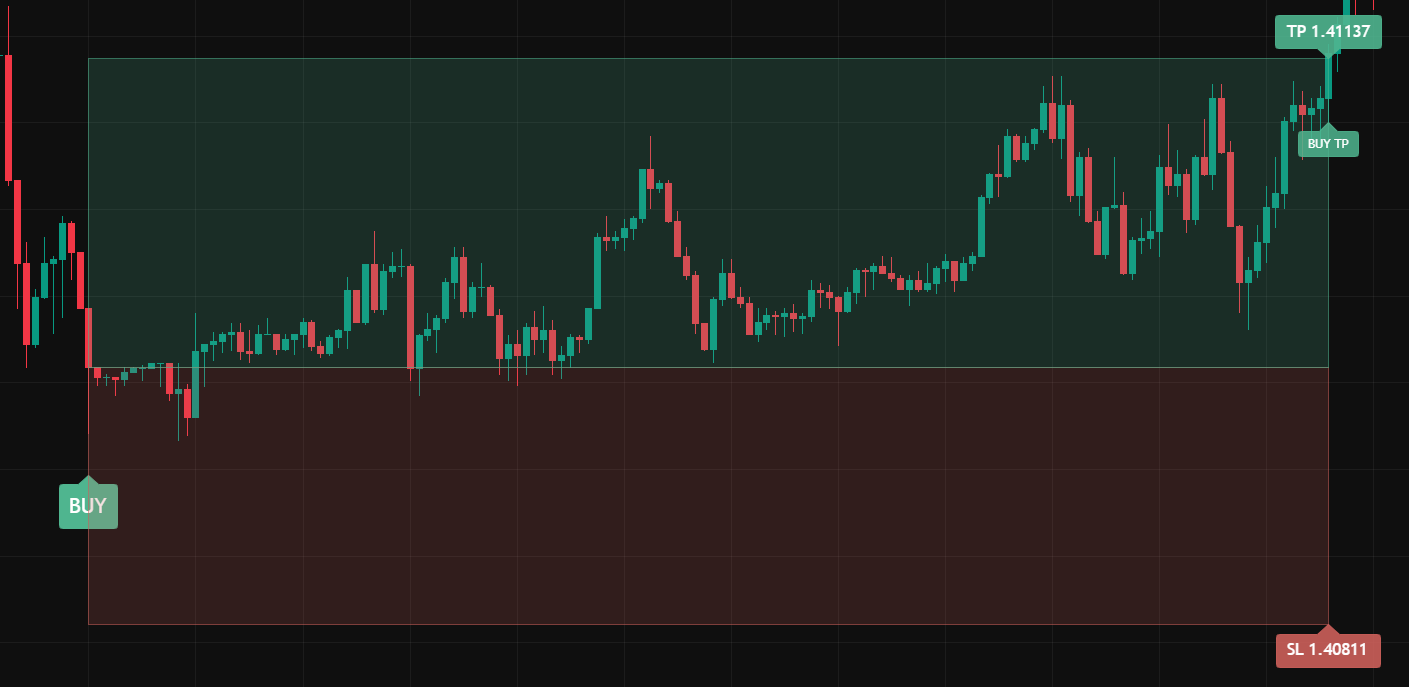
A BUY label prints below the bar or a SELL label above it, only when conditions align. Each signal ships with its stop-loss and take-profit zones already drawn. The trade is defined the moment it appears.
- 04
Respect the stay out
When the market is ranging, PaceAlgo stays silent and the market-condition panel says so. No signal is the call, not a gap.
Recommended markets
FX majors on 5-minute · major indices on daily.
On every other market PaceAlgo runs as an honest structure-and-regime read, not a validated edge claim. See the proof.
What's on the chart
Anatomy.
Everything PaceAlgo draws, explained.
Screenshots from September 2026. PaceAlgo is updated regularly, so colours and details on your chart may differ. Subject to change.
Signal labels
A BUY label prints below the bar, a SELL label above it, only on the bar a trade opens, and only when the engine's conditions align.
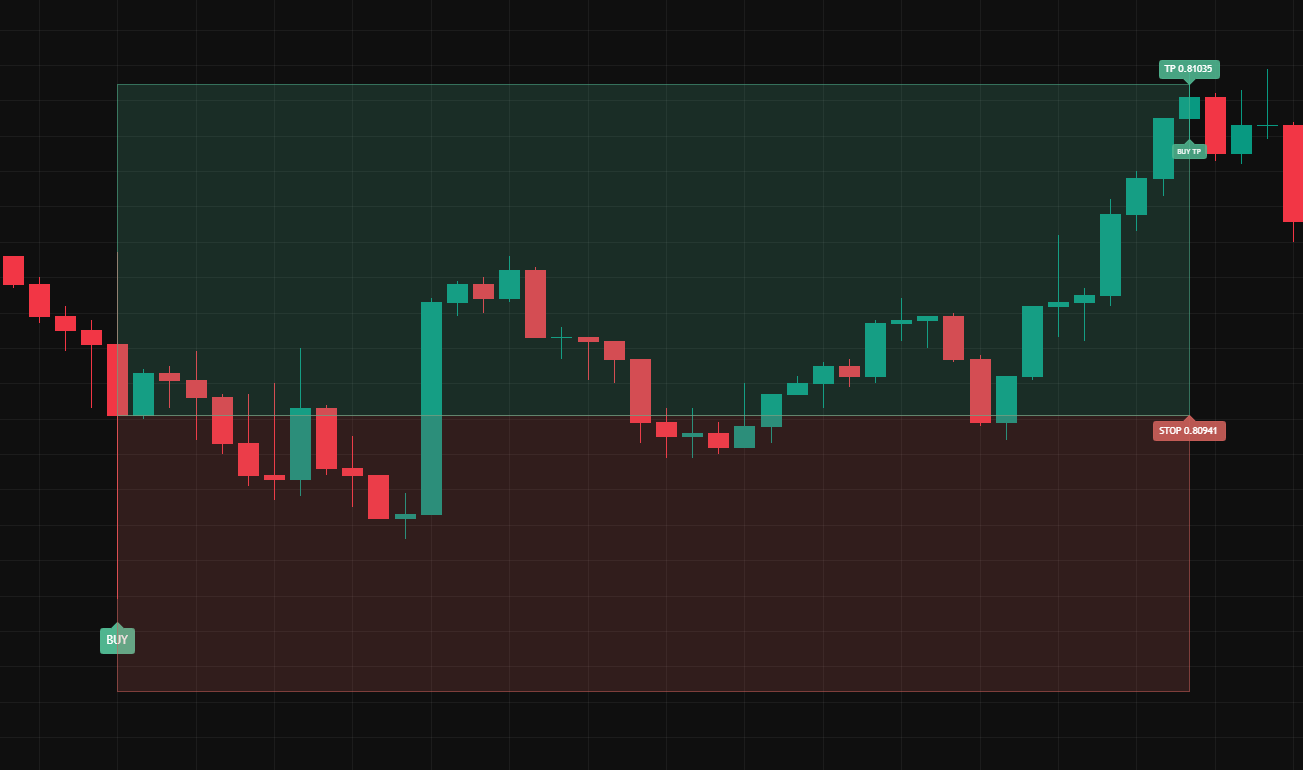
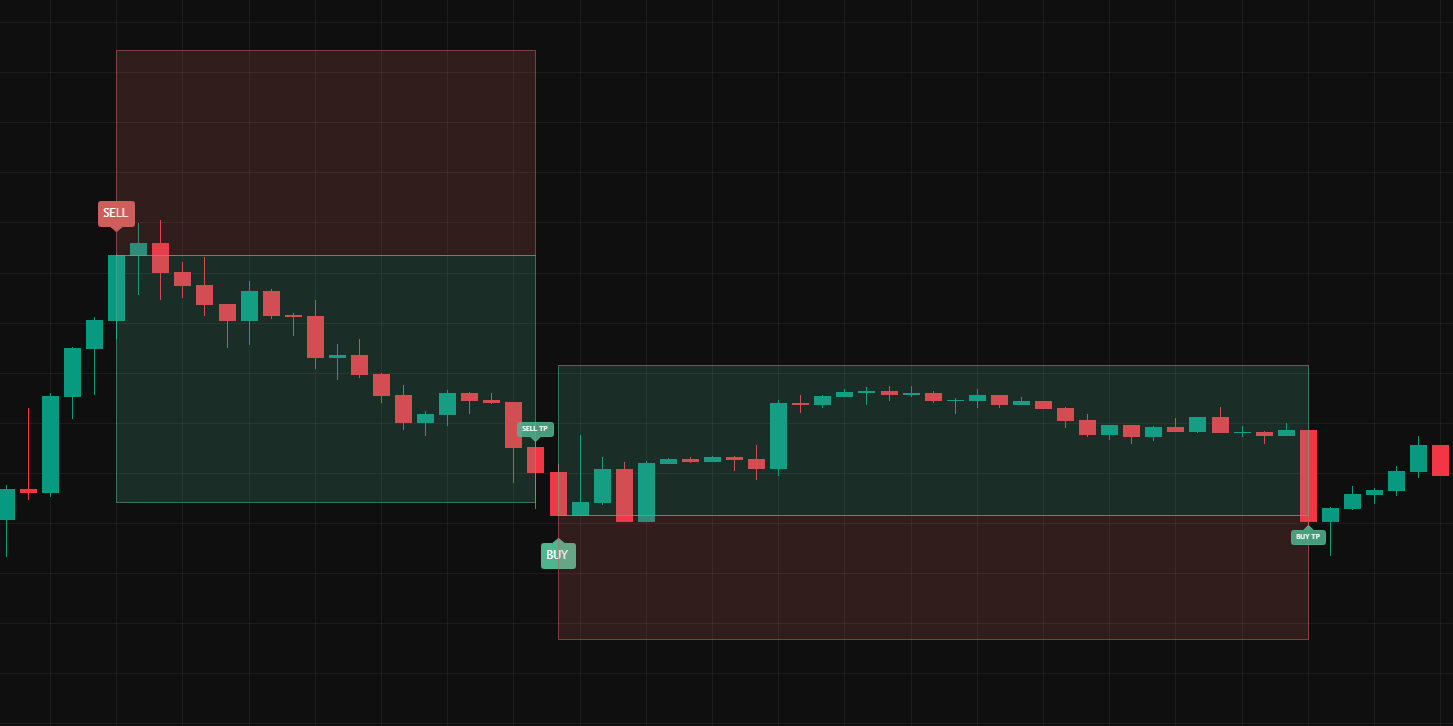
TP / SL zones
The filled boxes show the take-profit (green) and stop-loss (red) range for the running trade, with the exact prices tagged alongside.
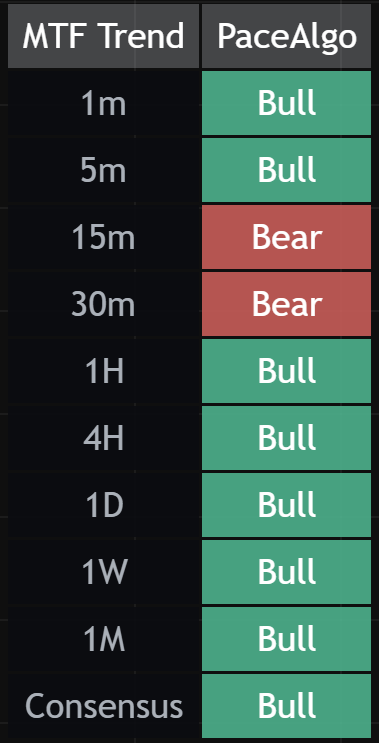
MTF dashboard
A table reading trend direction (Bull / Bear / Flat) across timeframes, with a consensus row. Alignment at a glance.
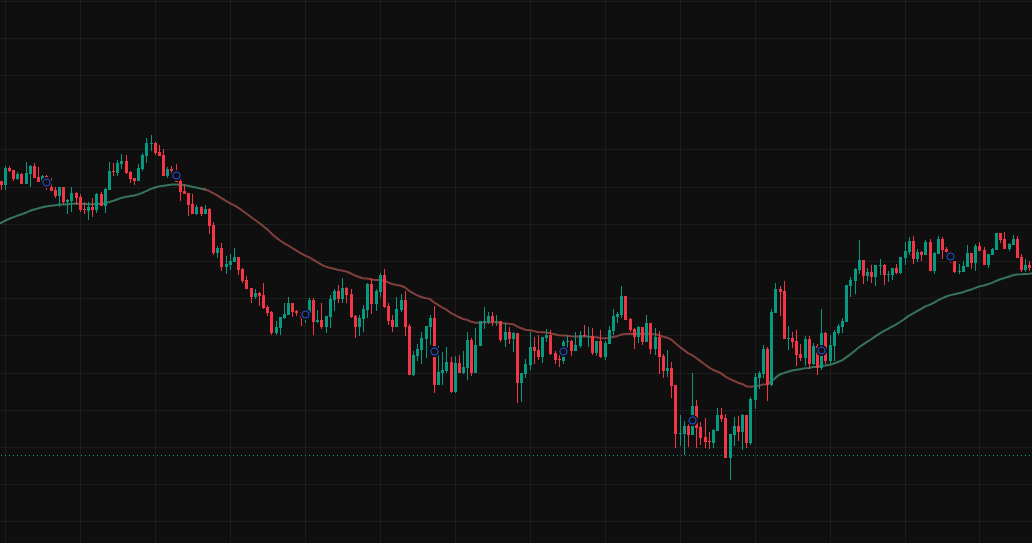
Trend baseline
A moving-average line that turns with the dominant trend direction: context for whether price is with or against the regime.
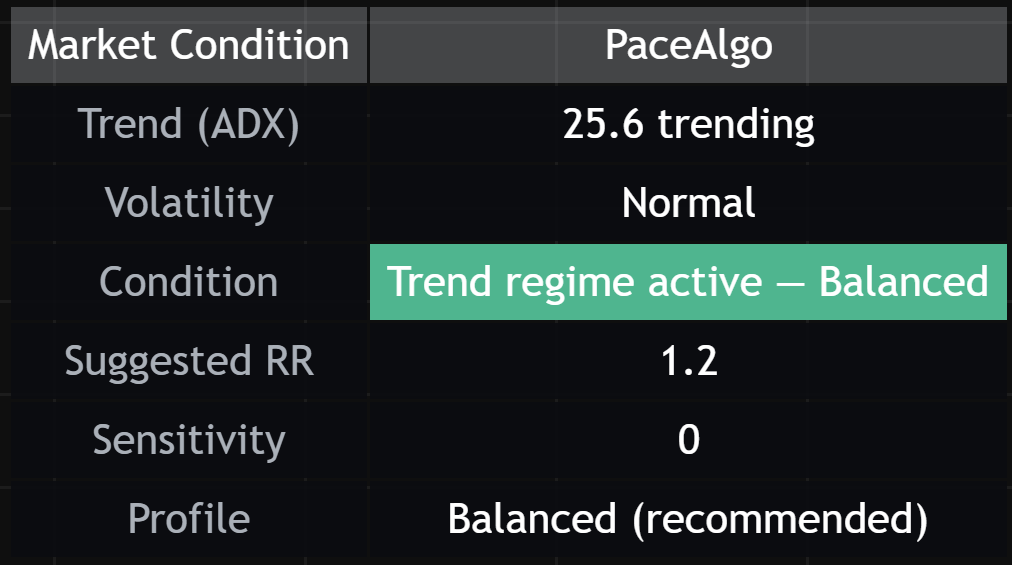
Market-condition panel
Reads the current regime (trending vs ranging), volatility, and whether conditions support trading at all. This is where “stay out” appears.
Backtest panel
Your chart, your window.
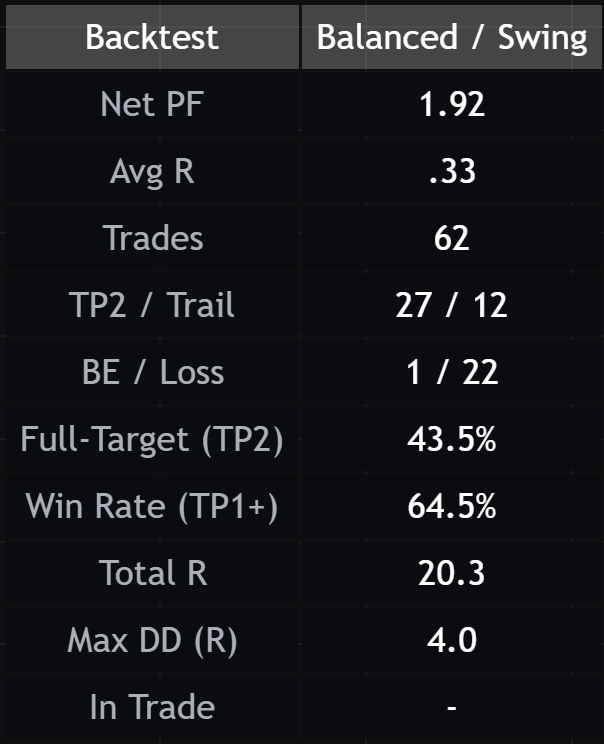
The on-chart performance summary for your symbol, settings and date window. The figures in the screenshot are one chart on one feed: read them as an example of what the panel shows, not as a result. Its last row says the same on your chart.
- Before costs. It's computed from the indicator's own stop and target levels, so it reads higher than a net figure.
- It won't match /proof. The numbers on /proof are measured on one controlled feed over a fixed window. This reads your broker's candles over whatever window your chart shows.
- Needs fifteen trades. Below fifteen closed trades it shows no ratio at all, because a profit factor off a handful of trades is noise.
Every setting
Settings.
The edge lives in the defaults.
Each setting shows what it changes and its default, the configuration we validated on. The out-of-sample results we publish, FX majors on 5m and major indices on daily, measured through the tool's own exit, after costs, are measured on these defaults. Change a behavioral setting and those numbers no longer apply. These controls let you fit the tool to your charts and horizon; they are not dials to turn until a win rate looks good. See the proof.
These change which signals fire or the results. The defaults are the validated configuration; changing any of them leaves the validated path.Change these freely. They don't affect which signals fire or the results.
Profile (signal selectivity)
Validated default · Auto (= Balanced)Sets how strict the signal engine is: the trend-strength threshold, whether higher-timeframe agreement is required, and (on Conservative) a volatility gate. Balanced is the configuration we validated on. Changing it changes which signals fire.
Sensitivity (− fewer / + more)
Validated default · 0Fine-tunes signal frequency on top of the profile, a frequency preference for different trading styles, not a profit lever. More signals does not mean more profit. The validated numbers apply at 0.
Trading Style
Validated default · IntradayDoesn't change when a signal triggers, but it scales the stop and target distances (Scalp = tighter, Swing = wider), so results come out differently. Intraday is the validated setting; changing it changes the backtest.
Risk / Reward Ratio (TP2)
Validated default · 1.2The final target as a multiple of the stop distance (the runner's target with Multi-TP on). 1.2 is the validated value; changing it changes the backtest.
Stop-Loss Width
Validated default · 1.0Scales the structure-based stop. Wider = fewer noise stop-outs, more risk per trade; tighter = more noise stop-outs, less risk per trade. 1.0 is the validated value; changing it changes the backtest.
Multi-TP (TP1 @1R + Break-Even + Trail)
Validated default · OnBanks half at exactly 1R, moves the stop to break-even, and trails the runner toward TP2. Improves the payoff distribution; TP1 is fixed at 1R by design. On is validated; turning it off changes the backtest.
Move stop to break-even at TP1
Validated default · OnOn: the stop moves to entry once TP1 is banked. Off: the stop stays at the original level (more runner risk). Changes the backtest when off.
Layout
Default · DesktopDesktop = three full panels. Mobile = one compact combined panel. Minimal = signals and levels only, no panels (clean charts / screenshots).
Quiet when conditions aren't aligned
Default · OffOpt-in. When on, new signals, levels and zones are hidden while the market is ranging, a calmer chart. Panels and backtest are unaffected.
Show TP1 price (live trade)
Default · OffShows the 1R level with a price tag on the running trade.
Buy/Sell labels · zones · price tags · trend baseline · panels · history tags · text size
Default · Sensible defaultsDisplay toggles. None change which signals fire or the results. Defaults are tuned to be readable out of the box.
Panel positions (Market condition · MTF · Backtest)
Default · Bottom-Left · Top-Right · Bottom-RightWhere each panel sits on the chart. Cosmetic.
Backtest stats from date
Default · 2024-01-01Changes the display window of the panel statistics (a different window shows different numbers), not the signals. A reading control, not a way to 'set' the validated results.
Discipline over dials
How to use it well.
Take stay out seriously
Most of the time, the highest-value call is no trade. When PaceAlgo is silent or the panel says stay out, that is the signal, not a gap to fill.
Don't overtrade the sensitivity
Turning sensitivity up gives you more signals, not more edge. If you want more activity, trade more markets on the defaults. Don't loosen the filter.
Trust the defaults
The published results are measured on the default configuration. Change settings to fit your horizon and screen, not to chase a better-looking backtest.
Let the risk levels do their job
Every signal ships with a defined stop and target. Size your position to the stop and let the trade resolve. The payoff distribution assumes you do.
Getting signals efficiently
Get notified.Don't just watch.
PaceAlgo is selective on purpose, so a single chart can be quiet for a day or two. A watchlist keeps the validated markets one click apart, but the watchlist itself won't flag a signal, so here's how to actually catch them.
- Set alerts or follow Discord. Either set your own TradingView alerts per symbol, which fire a popup or phone push the moment a signal prints (TradingView alerts require a paid TradingView plan), or follow the live signals in the member Discord (works on any plan; coverage is expanding across the validated markets). A multi-chart layout also lets you watch several markets at once. However you're notified, the alert flags the symbol, direction and entry. Open the chart in TradingView for the exact stop and target, which are plotted there.
- The validated signal is the default one. The signals we post in Discord, and the ones worth setting alerts on, come from PaceAlgo's default configuration, the one the published results are measured on. Change the behavioral settings and your own chart and alerts will fire different signals that aren't the validated ones.
- Match the timeframe to your schedule. Can't watch intraday? Lean on the daily index signals: you check once a day, the signal is set on the daily close, and it ships with its stop and target. The 5-minute FX signals (concentrated around the New York session) suit active traders who can watch or react quickly.
- Quiet days are normal. No signal is itself the call. Don't loosen the defaults to force more activity. Cover more of the validated markets instead.
FAQ · Troubleshooting
Questions.
I'm not seeing any signals. Is something wrong?
Almost certainly not. PaceAlgo is selective by design. It only signals where its conditions actually line up. In ranging or unclear markets it stays quiet on purpose; no signal is itself the call. If you want to confirm it's running, switch to a trending market on a validated timeframe (FX majors on 5m, major indices on daily) and you'll see it work. Silence isn't a bug. It's the tool refusing to force a trade.
Why is the market-condition panel showing gray / "stay out"?
That's the regime filter doing its job. When trend strength (ADX) is below the threshold, PaceAlgo reads the market as ranging, and in a range, it tells you to stay out rather than hand you a low-quality setup. Gray / "stay out" isn't an error; it's the honest answer that right now there's nothing worth trading.
Which TradingView plan do I need?
PaceAlgo runs on TradingView's free plan. A paid TradingView subscription isn't required to use it.
The indicator isn't showing up on my chart after purchase.
Access is granted to your specific TradingView account, so it only appears once your TradingView username is connected. Make sure you've provided your exact username after checkout. Then the invite is applied and PaceAlgo shows up under your Invite-only scripts in TradingView. If you've connected it and still don't see it after a little while, reach out at info@pacealgo.com.
I'm not getting my Discord member role.
Your paid role is assigned automatically once you connect your Discord account. If you skipped that step at checkout or the role didn't apply, head to pacealgo.com/claim, sign in with the Whop account you paid with, and connect Discord. The role is added straight away and removed automatically if your membership ends.
Still stuck? We're one message away.
The Discord is fast and public. Email is private and works for anything involving an account or a payment.